




JavaIO
IO,即输出输出。在开发过程中,应该是不会在终端进行各种操作的。我们很多时候会和文件打交道。
File
那我们具体如何实现文件的读取操作呢?答案很明显,File类,啊并不能实现文件的读取。通过查看File的源码,我们可以发现它主要是用来获取文件的基本信息,例如是否存在,是文件还是目录,是否可读写,获取文件大小,获取文件路径……,我们可以发现,它可以判断“是文件还是目录”,虽然但是,File类创建的变量是可以指向一个目录实例的。我们只使用File类时不会有IO异常,因为我们只是创建了File对象,并没有读写操作,只是获取文件的基本信息,这个操作是比较安全的。
构造方法
File类的构造方法都是带参的。File类中常用的public的构造方法有三个:
public File(String pathname)public File(String parent, String child)public File(File parent, String child)顾名思义,第一个就是直接传入文件的路径,可以是相对路径,也可以是绝对路径,第二个是传入父目录的路径和子目录或文件名,第三个是传入父目录的File对象,再传入子目录或文件名。传入文件路径时需要注意,不同的操作系统对路径的表示不同,我们以Windows举例:
import java.io.File;
public class Main { public static void main(String[] args){ //使用第一种方法 File file11 = new File("C:\\javaFiles"); //绝对路径 File file12 = new File(".\\test12.txt"); //相对路径 File file13 = new File("test13.txt"); //无奖竞猜
//第二种方法 File file21 = new File("C:\\directory","test21.txt"); File file22 = new File("..\\otherDir","test22.txt"); File file23 = new File("..\\otherDir","childDir"); //创建目录
//第三种方法 File dir = new File(".\\dir"); //先创建一个目录 File file31 = new File(dir,"test31.txt"); }}现在有个问题,file13的文件是哪里的文件呢。在没有指定完整路径时(即,绝对路径不是从盘符开始或者相对路径不是从.或..等开始),Java会认为字符串的路径是当前工作目录下出发的路径,可能理解成自动再其开头添加.\(由于\代表转义,所以我们在传入Windows的路径时要用\表示一个\)。对于IDE,工作路径是当前项目所在根目录;而在命令行中运行Java时,工作目录是命令行中当前所在目录。
常用方法
public String getAbsolutePath():返回此File对象的绝对路径名字符串。
public String getPath():返回此File对象的路径名字符串。
public String getName():返回由此File对象表示的文件或目录的名称。
public String getParent():返回此File对象父目录的路径名字符串;如果此路径名没有指定父目录,则返回null。
public File getParentFile():返回此File对象父目录的File对象;如果此路径名没有指定父目录,则返回null。
public boolean createNewFile():当且仅当具有该名称的新空文件实际被创建时,返回true。
public boolean mkdir():当且仅当目录被创建时,返回true。
public boolean mkdirs():当且仅当目录被创建时,返回true,包括创建所有必需但不存在的父目录。
public boolean delete():当且仅当文件或目录被删除时,返回true。
public boolean renameTo(File dest):当且仅当重命名成功时,返回true。
public boolean exists():当且仅当此File对象表示的文件或目录存在时,返回true。
public boolean isDirectory():当且仅当此File对象表示一个目录时,返回true。
public boolean isFile():当且仅当此File对象表示一个文件时,并且是一个正常的文件而非目录时,返回true。
public boolean isHidden():当且仅当此File对象表示的文件是一个隐藏文件时,返回true。
public long length():返回由此File对象表示的文件的长度,如果文件不存在则返回0L。
public long lastModified():返回表示此File对象最后修改时间的long值,如果文件不存在则返回0L。
public boolean canRead():当且仅当文件可读时,返回true。
public boolean canWrite():当且仅当文件可写时,返回true。
public boolean canExecute():当且仅当文件可执行时,返回true。
public File[] listFiles():返回一个File数组,表示此File对象表示的目录中的文件和目录。如果此路径名不表示一个目录,则返回null。
public File[] listFiles(FileFilter filter):返回一个File数组,表示此File对象表示的目录中的文件和目录,这些返回值满足filter的条件(如指定的后缀名等)。
下面是一些栗子,dirPath是以及设置好的目录路径:
public class Main { static dirPath = "C:\\JavaIOFiles" ; public static void main(String[] args){ File file = new File(dirPath, "text1.txt"); // 存在的文件 System.out.println(file.exists()); System.out.println(file.getName()); System.out.println(file.isFile()); System.out.println(file.isDirectory()); System.out.println(file.isHidden()); System.out.println(file.canRead()); System.out.println(file.canWrite()); System.out.println(file.canExecute()); System.out.println(file.length()); System.out.println(file.renameTo(new File(dirPath,"newName.txt"))); System.out.println(file.getName()); System.out.println(file.exists()); System.out.println(file.renameTo(new File(dirPath,"newNewName.txt"))); System.out.println(file.getName()); System.out.println(file.exists()); }}输出:
true text1.txt true false false true true true 0 true text1.txt false false text1.txt false
这里有一些猫腻,重命名后getName返回的还是原来的名字,但是renameTo方法返回的是true,而且原来的文件还不存在了。其实在JavaIOFIles目录中的text1.txt已经被重命名。这是因为renameTo会调用操作系统提供的重命名的API,并且根据传入参数的路径进行相应的重命名操作,但是File对象指向的还是原来的路径,它并不会更新,此时text1已经不是原来的text1了,当再调用exits方法时,Java并不会认为text1和newName是同一个文件,newName:我现在就在你眼前,你看我几分像从前?但是根据找不到text1这个文件,所以exits方法返回false。如果我们在renameTo传入的参数的构造方法中不指定路径,只给一个文件名时,就像上面说的,它会自动在前面添加.\,当在IDE里运行代码时,newName文件就跑到了项目的根目录。
Path
Path是一个接口,不是类。它内部实现了很多操作路径的方法。构造一个Path比较特殊,需要通过Paths类的get方法,返回一个Path类型值,再赋给Path类型的变量。
Path path = Paths.get(dirPath);Path的通常也是对路径做一些操作,或者作为Files类方法的参数,也可以转成File类,下面是一个简单的栗子:
Path path = Paths.get(dirPath);File file = path.toFile(); //转成File类System.out.println(path.toAbsolutePath()); //获取绝对路径try { byte[] bytes = Files.readAllBytes(path); //作为参数,读入文件内容 System.out.println(new String(bytes));} catch (IOException e) { System.out.println("IOException");}IO流
说了File和Path,但是单靠他们不能读写,这时IO流才能真正的读写。Java的IO流有两种:字节流和字符流,有输入字节流InputStream,写的输出字节流OutputStream,输入字符流Reader,输出字符流Writer。这四个是Java的四大基流。
OutputStream
输出字节流。所有的输出方面的字节流都是它的子类。当我们在IDEA里写OutputStream时:
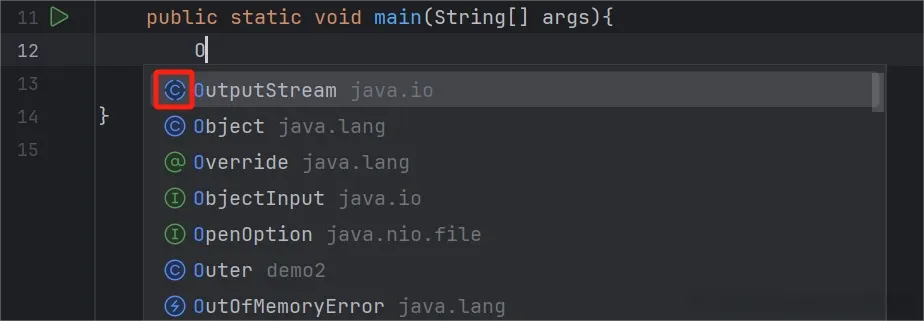
会发现它的图标是这样,然后我们再看它的源码:

发现这里赫然写着:abstract。没错它是一个抽象类,不能被实例化。我们需要实例化它的子类。但是在看它的子类之前,我们可以先看一下OutputStream为数不多的成员方法:
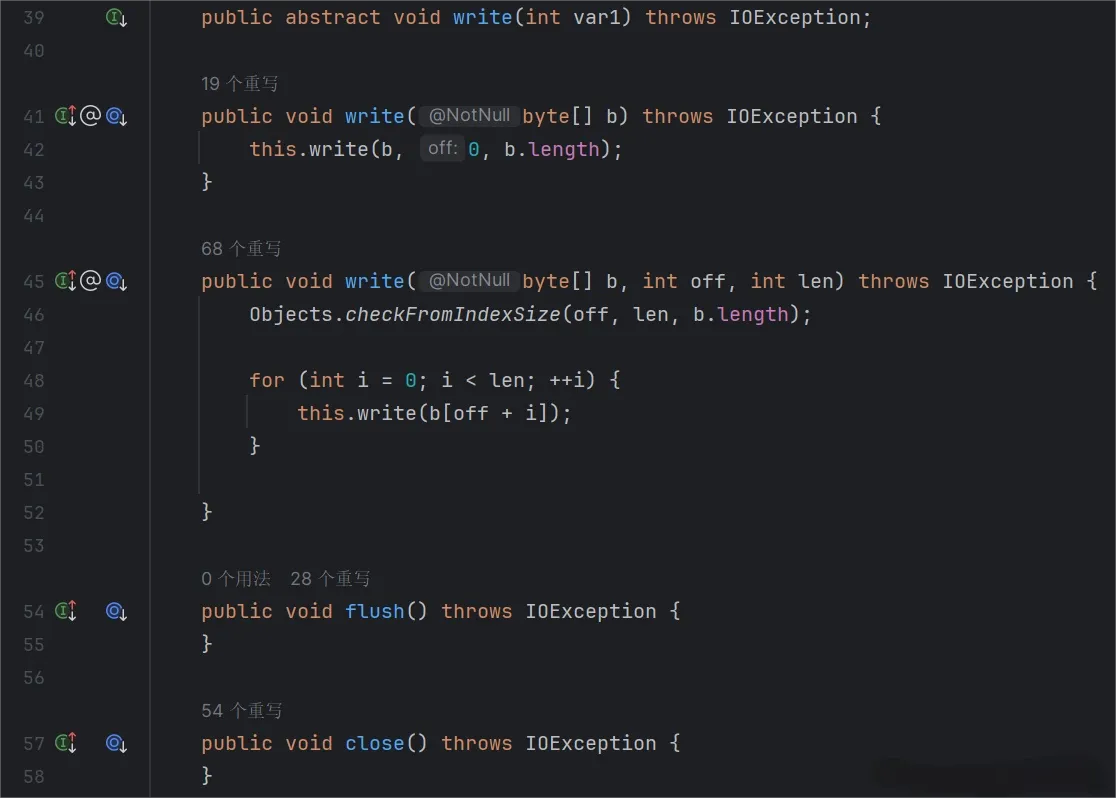
这里主要有三种方法:write,flush,close。三种方法顾名思义,而且具有逻辑性:先写,然后flush(见下文),再关闭流。很优雅的三部曲。
flush指的是刷新缓冲区。以将数据写入磁盘为例,并不是一次性将数据全部写进去,而是先写一个字节,再回到进程,这样子会不断地重复多次访问磁盘等,这是一个粗鲁的过程,很麻烦也很费时。所以在实际输出中,数据都是先暂存到缓存区,然后在访问磁盘时一次性写入多个数据,这才是优雅的输出。但是缓存区是有大小限制的,而且我们也不确定什么时候缓冲区的数据可以流到磁盘,可能会有数据丢失等不可预测的错误,而通过flush,可以强行先把缓存区的数据冲到磁盘,确保数据可以写入,这样就避免了上述问题。
而close,则是考虑到资源占用,还是以输出到磁盘举例,我们的输出字节流,后面有个流字,这意味着要从内存到磁盘专门建立一个数据流进行输出,这时磁盘内的目标资源就会被占用。如果我们输出结束,但是不关闭输出流,此时资源就会一直处于被占用的状态,这时如果有其他进程需要访问该资源,则会造成饥饿等问题。进行输出但不关流,可以说是占着那啥不那啥的事情,所以一定要记得关流,文明你我他。
看完属于抽象类的OutputStream,想要实现读写,就不得不和它的子类打交道了。
FileOutputStream
这个类也是顾名思义的,文件输出字节流。前面我们说的File并不能实现读写,而它,会完成我们的梦想。刚刚我们说了那么久的File类但是不能读写,但是,File类是读写的基础,在FileOutputStream的构造方法中,我们可以看到:
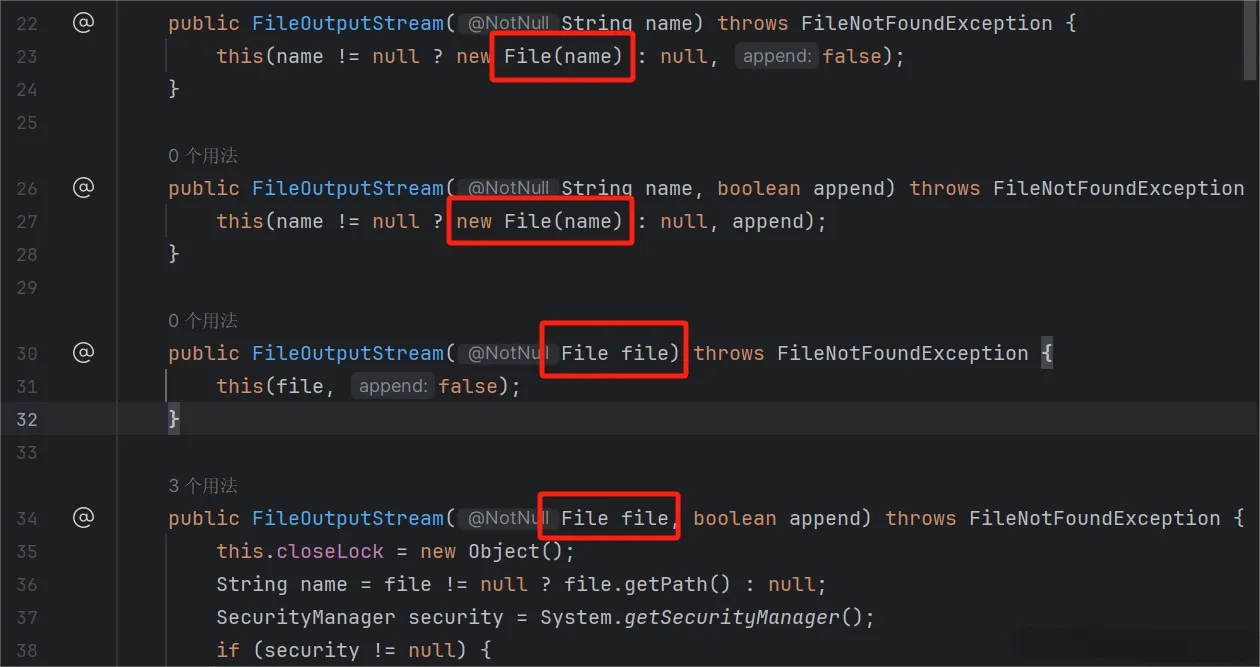
File是FileOutputStream的基础,构造FileOutputStream实例时需要File实例作为它输出的目的地。
创建
FileOutputStream主要有两个构造方法:
public FileOutputStream(String name)public FileOutputStream(File file)这两个方法的参数也是顾名思义的,至于其他方法后面的boolean appned,只是一个写入时是否是追加方式的标志。默认情况下它是false,意味着每次写入都是重新输出,并不会保留上次写入的内容。
创建文件字节输出流对象时,需要注意,它的构造方法后面都有throws FileNotFoundException,我们需要用try-catch语句包裹创建的语句:
OutputStream outputStream = null;try { outputStream = new FileOutputStream(dirPath);}catch (FileNotFoundException e){ System.out.println("not found");}但是这样子会出现一个问题,就是如果在new那一行抛异常了,try中剩余语句不再执行,流就没办法再关闭了,这时我们需要用finally语句关流:
OutputStream outputStream = null;try { outputStream = new FileOutputStream(dirPath);}catch (FileNotFoundException e){ System.out.println("not found");}finally { if (outputStream != null){ outputStream.close(); }}但是这样子可能有点麻烦,我们可以用try的资源管理来自动关流:
try (OutputStream outputStream = new FileOutputStream(dirPath)) { //……} catch (IOException e){ System.out.println("IOException");}此时catch中就是IOException,来捕获一切可能的IO异常(FileNotFoundException也属于IOException,前者是后者的子类)。
示例
它的常用方法就是它的父类中的写、刷新、关流。下面是一个简单的例子:
public class Main { static String dirPath = "C:\\JavaIOFiles\\text1.txt"; public static void main(String[] args){ try (OutputStream outputStream = new FileOutputStream(dirPath, true)) { outputStream.write(1); byte[] bytes = new byte[]{2,3,4,5}; outputStream.write(bytes); outputStream.flush(); outputStream.close(); } catch (IOException e){ System.out.println("IOException"); } }}此时在text1中,是这样子:

似乎并不是我们期待的12345。准确来讲,我们不应该期待12345,这里需要注意,OutputStream是字节流,它是以字节的形式输出的,拿1来举例,按照一个字节的形式输出,它本身就是1的八位二进制形式:00000001,在记事本中用UTF-8对00000001解码就是上面的样子了。如果我们write(65),则会解码成A。
如果是下面这样:
try (OutputStream outputStream = new FileOutputStream(dirPath, true)) { outputStream.write(1); byte[] bytes = "hello world".getBytes(); outputStream.write(bytes); outputStream.flush(); outputStream.close();} catch (IOException e){ System.out.println("IOException");}则会在texe1中会有hello world。(try会自动帮我们关流,那个close有些多余,但是有些时候一定要close)
之前在这里小编犯了一个错误,就是调用了Byte的parseByte方法:Byte.parseByte(“hello world”),想把字符串转成字节型,但是parseByte只是用于把字面量是字节型的字符串转成byte型,如1、255、250这些字符串等。hello world是不能转成字节型的,应该通过getByte来获得它的字节型表示,而不是把它转成字节型。
我们还可以设定输出的范围,通过write的一个重载方法:write(Byte[], int off, int len),可以将Byte中从第off个字节开始,输出len个字节:
try (OutputStream outputStream = new FileOutputStream(dirPath)){ byte[] bytes = "hello world".getBytes(); outputStream.write(bytes, 1, 4); outputStream.flush();}catch (IOException e){ System.out.println("IOException");}此时文件中是:ello
FilterOutputStream
它是对输出流的一个装饰,有三个子类。
BufferedOutputStream
顾名思义,我们查看它的源码,可以发现这个东西:
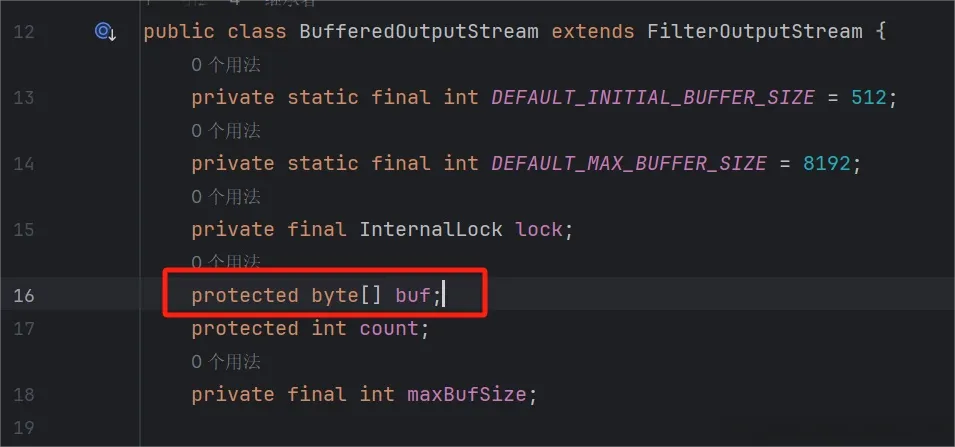
可以发现,里有自己的缓冲区。它可以让输出更高效,具体的输出方法还是类似FileOutputStream,输出字节型数据:
try (BufferedOutputStream bufferedOutputStream = new BufferedOutputStream(new FileOutputStream(dirPath))){ byte[] bytes = "hello".getBytes(); bufferedOutputStream.write(bytes); bufferedOutputStream.flush();} catch (IOException e){ System.out.println("IOException");}此时text1中是:hello
DataOutputStream
之前我们用文件字节输出流输出的只是字节型的数据,而一个字节是有大小限制的,当我们想输出一个10000这样的整型数据,或者Double型的数据时单通过字节很难实现,而DataOutputStream可以实现,不过要注意的是,此时还是以二进制写入文件,并非数据本身,我们在txt文档(使用UTF-8解码)中不会看到我们写入的类似10000这样的数据,这和FileOutputStream的write(1)是一个道理。
try (DataOutputStream dataOutputStream = new DataOutputStream(new FileOutputStream(dirPath, true))){ dataOutputStream.writeChar('a'); dataOutputStream.writeChars("oi!"); dataOutputStream.writeInt(123); dataOutputStream.writeDouble(3.14); dataOutputStream.flush();} catch (IOException e){ System.out.println("IO");}此时后面的123和3.14这两个数据在txt文档中显示并不是123和3.14,而是一堆奇怪的东西。另外,writeChars会给字符串中的每个字符之间加上空格。
PintStream
真神降临。我们都用过System.out中的各种输出方法,而PrintStream同样也有对应的输出方法,我们可以通过这些输出方法,输出各种数据类型,而且并不会向FileOutputStream或者DataOutputStream一样只是输出字节形式,真正实现输出的“所见即所得”:
public class Main { static String dirPath = "C:\\JavaIOFiles\\text1.txt"; public static void main(String[] args){ try (PrintStream printStream = new PrintStream(new FileOutputStream(dirPath, true))){ int x = 3; double y = 3.14; String s = "hello"; printStream.println(x + " " + y); printStream.print(s); printStream.println(); printStream.println("wuhu~"); printStream.printf("%.5f",y); printStream.flush(); } catch (IOException e){ System.out.println("IO异常"); } }}此时text1中:
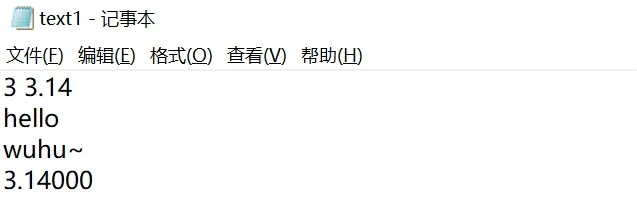
其实PintStream和System.out功能差不多,只不过前者是文件流,最后输出到指定位置;而后者是标准输出流,最后输出到终端。
ObjectOutputStream
顾名思义,对象输出字节流。它可以将一个对象序列化。序列化是指把一个对象转成字节的形式存储。这有什么用呢?我们写一般的小代码时,创建一个对象后,如果程序结束运行,该对象也会消失,其对应的上次运行后的状态也会消失,而通过序列化,我们可以把一个对象在某次运行后的状态保留到数据库中,即使程序运行结束状态也不会丢失,等到下次程序运行时,直接在数据库中读取该对象,通过反序列化重构对象,恢复原有状态。这是很有用的,毕竟一次性的程序用处也不大。另外,网络传输对象也是通过序列化实现的。要被序列化的对象的所属类必须要实现Serializable接口,表明它是可序列化的。
下面是一个例子:
import java.io.*;
public class People implements Serializable { private int age = 0; private int height = 0;
public People(int age, int height) { if (age < 0 || age > 200 || height < 0 || height > 300){ System.out.println("数据不合理"); return; } this.age = age; this.height = height; }
public int getAge() { return age; }
public void setAge(int age) { if (age < 0 || age > 200){ System.out.println("年龄不合理"); return; } this.age = age; }
public int getHeight() { return height; }
public void setHeight(int height) { if (height < 0 || height > 300){ System.out.println("身高不合理"); return; } this.height = height; }}
public class Main { static String dirPath = "C:\\JavaIOFiles\\text1.txt"; public static void main(String[] args){ try (ObjectOutputStream objectOutputStream = new ObjectOutputStream(new FileOutputStream(dirPath))){ People lisi = new People(18, 180); objectOutputStream.writeObject(lisi); objectOutputStream.flush(); } catch (IOException e){ System.out.println("IOIO"); } }}此时text1中存放的就是lisi这个对象实体的信息。 更好的方法是我们自己定义一个序列化的函数,传入需要序列化的对象,再进行序列化:
static void serializeObject(Object object){ try (ObjectOutputStream objectOutputStream = new ObjectOutputStream(new FileOutputStream(dirPath))){ objectOutputStream.writeObject(object); objectOutputStream.flush(); } catch (IOException e){ System.out.println("IOException"); System.out.println("序列化失败"); } System.out.println("序列化成功");}在实际项目中在序列化函数中的参数中也可以加上对象所在的文件名,方便反序列化等。欲知何为反序列化,请看后文。
PipedOutputStream
顾名思义,不过顾完名以后先别急着思义,先明确一个概念,piped,不是pip+ed,是pipe+d。pip是种子,和我们这个流没啥关系,我们这个流真正的核心是pipe:
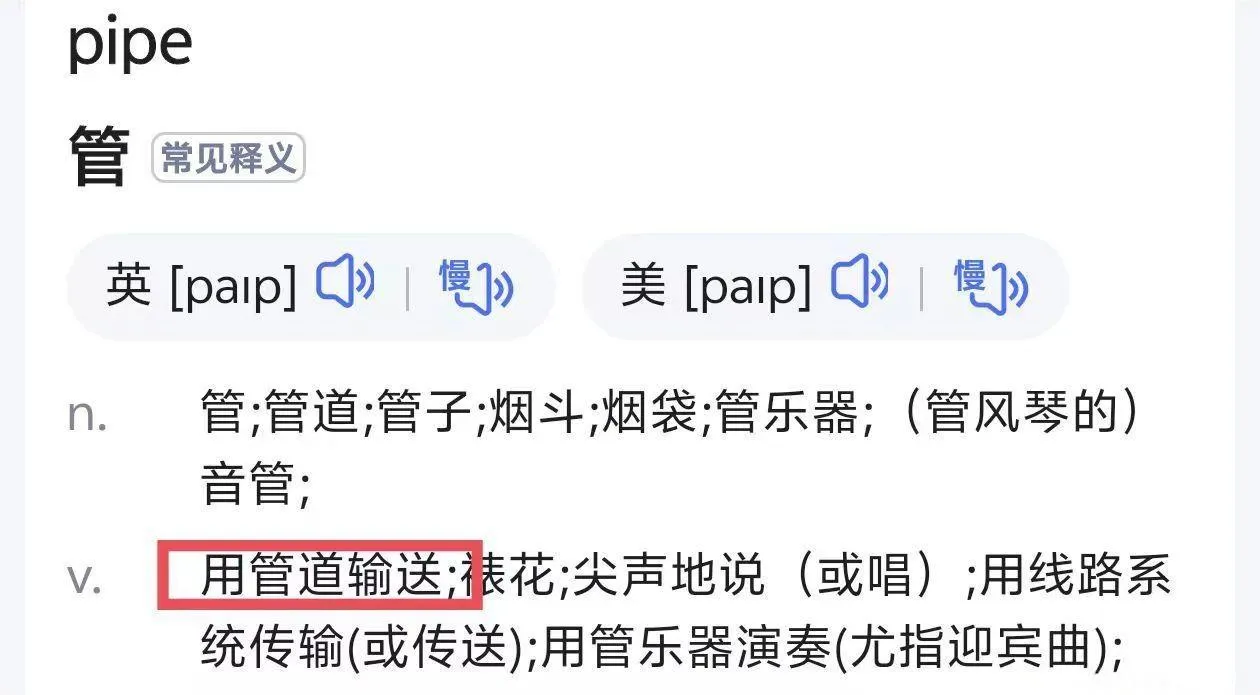
现在再思义,PipedOutputStream和缓冲区连接了一个管道,它通常与PipedInputStream搭配,通常用于多线程的数据处理。需要注意的是,它是和缓冲区连接,所以它并不操作文件。它的输出方式也是按照字节形式输出。
ByteArrayOutputStream
这个流是用来在内存中临时生成一个缓冲区,它也不需要操作文件,一般临时构建字符数组时需要ByteArrayOutputStream。一般步骤是先把几个字节数组写入缓冲区,再通过toByteArray方法转成一个数组,有时也可以通过toString直接转成字符串。
public class Main { public static void main(String[] args) { try (ByteArrayOutputStream byteArrayOutputStream = new ByteArrayOutputStream()){ byteArrayOutputStream.write("hello ".getBytes()); byteArrayOutputStream.write("world".getBytes()); byte[] bytes = byteArrayOutputStream.toByteArray(); String str = byteArrayOutputStream.toString(); System.out.println(Arrays.toString(bytes)); System.out.println(str); } catch (IOException e){ System.out.println("IO"); } }}输出:
[104, 101, 108, 108, 111, 32, 119, 111, 114, 108, 100] hello world
InputStream
输入字节流。所有的读入方面的字节流都是它的子类。它和OutputStream类似,也是一个抽象类。它有和OutputStream的write方法对应的read方法,当然也有close方法。不过不同于输出的是,读取数据不需要刷新缓冲区,它没有flush。InputStream的常用方法有:read,close,skip,avaliable,mark,markSupported,reset等,先说read,其余的在例子中再逐一介绍。
read有三个重载:
int read(),读取文件中的一个字节,并且以int类型返回。返回值的范围在0~255。 int read(byte[] b),读取尽可能多的字节数,并存放到b数组中,返回实际读取的字节数,如果已经到文件尾,则返回-1。 int read(byte[] b, int off, int len),读取最多len个字节的数据,从b数组中偏移值为off的地方开始存储读取到的数据。如果到文件尾则返回-1。
上面的2和3是不是很眼熟,它和write对应的第2、3个重载很类似,用法也很类似。
上面说到InputStream是抽象类,想要真正读取数据需要靠它的子类。
FileInputStream
和输出流字节流类似,输入字节流也有对应的文件输入字节流。构造方法和用法也差不多,只不过输入流的构造方法没有是否追加(append)这个参数。下面是一个例子:
public class Main { static String dirPath = "C:\\JavaIOFiles\\text1.txt"; public static void main(String[] args) { try (InputStream inputStream = new FileInputStream(dirPath)){ int data; while ((data = inputStream.read()) != -1){ System.out.print((char) data); } } catch (IOException e) { System.out.println("IO"); } }}我们text1中的内容是:hello world !
此时输出:
hello world !
如果用read的其他重载,像这样:
try (InputStream inputStream = new FileInputStream(dirPath)){ byte[] buffer = new byte[1024]; System.out.println(); inputStream.read(buffer); System.out.println(new String(buffer));} catch (IOException e) { System.out.println("IO");}此时输出结果不光是hello world !,而是:

后面都是空字符,所以我们一般在以数组作为参数时,要用到read的返回值(读取的字节数),以便我们转成字符串时确定要把数组的哪部分转成字符串。就像这样:
try (InputStream inputStream = new FileInputStream(dirPath)){ byte[] buffer = new byte[1024]; System.out.println(); int readBytes = inputStream.read(buffer); System.out.println(new String(buffer, 0, readBytes)); //将buffer数组的第0位开始的后readBytes个字节转成字符串} catch (IOException e) { System.out.println("IO");}此时输出:
hello world !
每次都设定readBytes貌似有点麻烦,也可以通过readNbytes或readAllbytes来实现,此时最开始创建的buffer无需指定长度,调用上述两个方法会返回一个byte[]对象的引用,我们只需把这个引用赋给buffer,让buffer指向这个数组实体即可。这两个方法中,观察后者的源码:
 可以发现,后者只是前者设定参数为Integer.MAX_VALUE的情况,下面是一个简单的例子:
try (FileInputStream inputStream = new FileInputStream(dirPath)){ byte[] buffer; buffer = inputStream.readAllBytes(); System.out.println(new String(buffer));} catch (IOException e) { System.out.println("IO");}输出同样是:
hello world !
我们也可以通过markSupported,mark,reset,skip等方法来控制读入:
boolean markSupported():判断是否可以标记
void mark(int readlimit):在当前位置设置标记,readlimit表示可以读取的最大字节数,如果试图在标记之后读取超过这个限制的数据,那么标记可能会失效
void reset():将输入流的当前位置重置到最近的一次标记,如果无有效标记,则抛出IOException
通过设置标记我们可以重复读入某段数据:
try (InputStream inputStream = new FileInputStream(dirPath)){ //text1中是:hello world ! byte[] buffer = new byte[1024]; int readBytes = 0; readBytes += inputStream.read(buffer, 0, 1); //读入一个h,现在指针停在e处 inputStream.mark(1024); //在当前位置e处做标记 readBytes += inputStream.read(buffer, readBytes, 3); //读入ell inputStream.reset(); //回到e处 readBytes += inputStream.read(buffer, readBytes, 3); //再读入ell System.out.println(new String(buffer, 0, readBytes));} catch (IOException e) { System.out.println("IOException");}此时输出:
IOException
喜提一个IO异常,因为重置流需要在缓冲区去标记位置,而FileInputStream直接从系统底层读取数据,没有任何内部缓冲,不可以进行标记回溯,所以在进行标记时抛出了IO异常。想要回溯,需要通过后面的BufferedInputStream。
FilterInputStream
和FilterOutputStream类似,是对FileInputStream的一个包装,使其具有更多功能。它也有三个子类:
BufferedInputStream
具有缓冲区的输入流,它可以实现刚刚我们说的设置标志:
try (InputStream inputStream = new FileInputStream(dirPath); BufferedInputStream bufferedInputStream = new BufferedInputStream(inputStream)){ //text1中是:hello world ! byte[] buffer = new byte[1024]; int readBytes = 0; readBytes += bufferedInputStream.read(buffer, 0, 1); //读入一个h,现在指针停在e处 if (bufferedInputStream.markSupported()){ bufferedInputStream.mark(1024); //在当前位置e处做标记 } else { System.out.println("不可标记"); return; } readBytes += bufferedInputStream.read(buffer, readBytes, 3); //读入ell bufferedInputStream.reset(); //回到e处 readBytes += bufferedInputStream.read(buffer, readBytes, 3); //再读入ell System.out.println(new String(buffer, 0, readBytes));} catch (IOException e) { System.out.println("IOException");}输出:
hellell
DataInputStream
与DataOutputStream基本相同,只不过一个读一个写,读入的基本方法也和DataOutputStream类似。
PushbackInputStream
它可以把数据再推回流中,一般用于处理一些特殊字符,如果遇到特殊情况,需要把字符推回,再重新读取,或者进行其他操作。下面是一个读入并推回的简单例子:
try (PushbackInputStream pushbackInputStream = new PushbackInputStream(new FileInputStream(dirPath))){ int data = pushbackInputStream.read(); System.out.println((char) data); pushbackInputStream.unread(data); data = pushbackInputStream.read(); System.out.println((char) data);} catch (IOException e) { System.out.println("IO");}输出:
h h
ObjectInputStream
对象读入流,和其输出流对应,用于对象的序列化和反序列化,保存对象信息。
我们还拿上面ObjectOutputStream中的People类为例,假设我们现在已经有一个年龄20岁,身高170cm的对象(已经被序列化存到文件中),他突然想要长高,接下来我们运行程序给他增高5cm:
public class Main { static String dirPath = "C:\\JavaIOFiles\\text1.txt"; public static void main(String[] args) { People example; try (ObjectInputStream objectInputStream = new ObjectInputStream(new FileInputStream(dirPath))) { example = (People) objectInputStream.readObject(); //读取对象,注意要转成对应类型 System.out.println("年龄:" + example.getAge()); System.out.println("身高" + example.getHeight()); example.setHeight(example.getHeight() + 5); System.out.println("增高后:"); System.out.println("年龄:" + example.getAge()); System.out.println("身高" + example.getHeight()); serializeObject(example); //再将其序列化,保存信息 } catch (IOException e) { System.out.println("IOException"); } catch (ClassNotFoundException e) { System.out.println("ClassNotFound"); } } static void serializeObject(Object object){ try (ObjectOutputStream objectOutputStream = new ObjectOutputStream(new FileOutputStream(dirPath))){ objectOutputStream.writeObject(object); objectOutputStream.flush(); } catch (IOException e){ System.out.println("IOException"); System.out.println("序列化失败"); } System.out.println("序列化成功"); }}第一次运行程序,输出:
年龄:20 身高170 增高后: 年龄:20 身高175 序列化成功
再一次运行程序,输出:
年龄:20 身高175 增高后: 年龄:20 身高180 序列化成功
如果增高后不将其序列化,那么第二次运行读取到的对象还是170的他。
PipedInputStream
和其对应的输出流类似,和缓冲区连接一个数据流,一般用于多线程。如果在同一线程内同时使用PipedInputStream和PipedOutputStream,则可能产生死锁等问题。
SequenceInputStream
通常,在读入文件数据过程中,数据不一定只来源于一个文件,当读取多个文件时,我们就需要创建多个读入流。而SequenceInputStream可以把这些流串联起来方便管理。它有两种构造方法:
public SequenceInputStream(Enumeration<? extends InputStream> e)public SequenceInputStream(InputStream s1, InputStream s2)第一种传入一个含有多个输入流的容器,第二种直接传入两个流。
我们以第二种为例,text1中是hello,text2中是world!:
public class Main { static String dirPath = "C:\\JavaIOFiles\\text1.txt"; static String anotherPath = "C:\\JavaIOFiles\\text2.txt"; public static void main(String[] args) { try (FileInputStream inputStream1 = new FileInputStream(dirPath); FileInputStream inputStream2 = new FileInputStream(anotherPath); SequenceInputStream sequenceInputStream = new SequenceInputStream(inputStream1, inputStream2)){ byte[] buffer; buffer = sequenceInputStream.readAllBytes(); System.out.println(new String(buffer)); } catch (IOException e) { System.out.println("IOException"); } }}输出:
helloworld!
ByteArrayInputStream
它貌似和ByteArrayOutputStream名字有点像以外,其他的没有什么类似之处。字节数组输入流允许直接读取一个字节数组,它也不涉及文件操作,不需要和文件关联,但由于它要读入字节数组,它需要和字节数组关联,也就是说,它的构造方法中传入的关联对象是字节数组而非文件。
byte[] bytes = "hello world".getBytes();try (ByteArrayInputStream byteArrayInputStream = new ByteArrayInputStream(bytes)){ byte[] buffer; buffer = byteArrayInputStream.readAllBytes(); System.out.println(new String(buffer));} catch (IOException e) { System.out.println("IO");}输出:
hello world
Writer
字符输出流,它可以直接输出字符而无需像字节流一样进行字符转换的操作。它有的常用方法有:write,append,flush,close。与字节流不同,它的writer方法的参数是char[]类型或者String类型。它也是抽象类,也需要通过子类创建实例。
BufferedWriter
和BufferedOutputStream类似,有缓冲区的字符输出。
OutputStreamWriter
它是对OutputStream的一个包装,可以把字节流包装成字符流使用:
try (OutputStreamWriter outputStreamWriter = new OutputStreamWriter(new FileOutputStream(dirPath))){ outputStreamWriter.write("oh"); outputStreamWriter.flush();} catch (IOException e){ System.out.println("IO");}此时text1中是:oh
FileWriter
它是OutputStreamWriter的子类,和FileOutputStream类似。
PrintWriter
和PrintStream类似,功能强大,支持格式化输出,println,print,printf等它都有。它也是向文件输出,也需要关联文件。
StringWriter
和ByteArrayOutputStream类似,可以用于字符串的临时拼接:
try (StringWriter stringWriter = new StringWriter()){ stringWriter.write("hello"); stringWriter.write(" world"); stringWriter.flush(); String s = stringWriter.toString(); System.out.println(s);} catch (IOException e){ System.out.println("IO");}输出:
hello world
PipedWriter
和PipedOutputStream类似。
CharArrayWriter
和ByteArrayOutputStream以及StringWriter类似,它们类内都定义了自己的缓冲区(其中StringWriter的缓冲区由StringBuffer实现)。也可以用来临时拼接字符串和字符数组。
try (CharArrayWriter charArrayWriter = new CharArrayWriter()){ charArrayWriter.write("hello"); charArrayWriter.write(" world!"); char[] chars = charArrayWriter.toCharArray(); String s = charArrayWriter.toString(); System.out.println(chars); System.out.println(s);} catch (IOException e){ System.out.println("IO");}输出:
hello world! hello world!
Reader
输入字符流,它和所对应的Writer的含义类似,它的子类和Writer对应的子类类似,它的读入方法和InputStream对应读入方法类似(read,skip,mark等)。下面是它的子类:
BufferedReader
InputStreamReader
FileReader
StringReader
PipedReader
ByteArrayReader
FilterReader
PushbackReader
每个子类的作用和Writer对应的子类类似,读入方式和InputStream类似,都是read,skip,mark等,只不过参数从字节数组变成了字符数组或字符串。
文章分享
如果这篇文章对你有帮助,欢迎分享给更多人!
部分内容可能已过时